Best Budget-Friendly Red Light Therapy Devices
Quick Summary
This article explains how to use Hooga Red Light Therapy Devices for Maximum Results. Getting the best possible gains involves choosing distances and treatment times based on those goals, creating consistent routines, optimizing your treatment space and positioning, and avoiding common mistakes that sabotage results.
It’s aimed at helping you go beyond random usage so you actually see the benefits from red and near-infrared light therapy with Hooga panels.
In addition to Hooga being a budget-friendly choice among other more expensive brands, they have teamed up with TrueMed to make things even easier on your wallet. You can use your HSA or FSA to pay for eligible Hooga products, which means you’re using pre-tax dollars. For many people, that works out to savings of around 30–40% overall.
Table of Contents
- Introduction – Why execution matters more than just owning a device.
- Understanding Your Treatment Goals – How your goals influence wavelength choice, distance, and timing.
- Setting Up Your Treatment Space – Tips for choosing a convenient and comfortable setup.
- Mastering Distance and Positioning – How distance affects treatment intensity and coverage.
- Creating Your Treatment Protocol – Daily and targeted routines for different goals.
- Common Mistakes to Avoid – Errors that reduce results or waste time.
- Conclusion – Recap of why strategy and consistency are key.
- FAQ’s
Introduction
I’ll be honest with you, when I first got my hands on a red light therapy device, I stood there staring at it like it was some kind of alien technology. I turned it on, held it near my face for what felt like a reasonable amount of time, and hoped for the best.
No real strategy. No understanding of distance, timing, or wavelength selection. Just me and a glowing red panel in my bathroom, desperately hoping my skin would magically transform. Sound familiar?
Having a quality Hooga device is only half the equation. The other half, the part that actually decides whether you see life-changing results or just waste electricity, comes down to how you use it.
And I mean really use it, not just flip it on and zone out while scrolling through your phone.
After taking a close look at the research, experimenting with different protocols, and learning from some seriously frustrating mistakes, I’ve figured out exactly what separates people who get incredible results from red light therapy from those who give up after three weeks, claiming “it doesn’t work.” The difference usually has nothing to do with device quality and everything to do with execution.
So, let me walk you through everything you need to know about actually using your Hooga device effectively, from the technical setup details that matter way more than you’d think, to the daily protocols that stack results over time, to the sneaky mistakes that sabotage progress without you even realizing it.
First things first, we need to talk about what you’re actually trying to accomplish here, because your goals completely dictate your approach.
In this article on how to use Hooga red light therapy devices for maximum results, we will provide guidelines and approximations based on clinical and anecdotal data. These are not meant to be interpreted as guarantees. Results will vary from person to person.
As will be discussed in this article, and as many red light practitioners agree, consistent usage provides consistent results. This is a long-term investment in your health.
That being said, professional red light therapy sessions can range from $75 – 125 per session. That’s where Hooga comes in.
Hooga creates affordable and effective at-home red light therapy devices that soften the initial financial blow.
So, if you are still ‘on the fence’ in terms of diving into red light therapy device ownership, the cost-savings calculator below will help calculate the real numbers and alleviate some of the financial confusion around this purchase decision.
Red Light Therapy: Clinic vs Home Device
Calculate how much you’ll save by investing in the Hooga PRO300 instead of paying for clinical sessions
Understanding Your Treatment Goals
Before you even think about turning on your Hooga device, you need to get crystal clear on what you're actually targeting. This varies dramatically from person to person and from goal to goal.
The way I use red light for post-workout muscle recovery looks completely different from how my wife uses it for facial anti-aging, which looks totally different from how my dad uses it for chronic knee pain. Each application needs its own specific approach.
Your primary goal decides three critical variables: which wavelength mode you'll emphasize, how close you position yourself to the device, and what time of day you schedule sessions. Get these three things aligned with your actual goals, and you'll see results.
Mess them up, and you'll wonder why nothing seems to be working.
If you're focused on skin health, reducing fine lines, improving texture, evening out tone, and boosting collagen production, you're primarily interested in the 660nm red light wavelength. This visible red light penetrates the skin's surface layers where collagen-producing fibroblasts live.
These cells respond really well to this specific wavelength, ramping up their collagen synthesis when exposed regularly.
You'll want closer positioning, somewhere between 6-12 inches from the device, and consistent daily sessions work best. I prefer morning sessions for skin work because your skin cells are most active in repair mode during the early part of the day.
There's actual research backing this up, showing that cellular repair mechanisms follow circadian rhythms.
For deeper tissue work like muscle recovery, joint pain relief, or systemic inflammation reduction, the 850nm near-infrared wavelength becomes your primary tool. This invisible light penetrates much deeper; we're talking several inches into tissue, reaching muscles, tendons, and even bones.
The photons travel through your skin and fat layers to reach these deeper structures where they can influence mitochondrial function in muscle cells and other tissues.
Athletes typically use this post-workout when inflammation is elevated, and tissues are primed for recovery signaling.
The timing matters because you're essentially giving your body an extra boost right when it's trying to repair and rebuild from the stress of training.
Then there's the combination approach, which honestly makes sense for most people. Using both wavelengths simultaneously (what Hooga calls L3 mode on devices like the Charge 2.0) gives you surface-level skin benefits while simultaneously addressing deeper tissue concerns.
This is what I personally run most of the time because I'm not just after one specific outcome; I want the comprehensive wellness benefits that come from treating both superficial and deep tissues.
Your goals also decide frequency and duration, which people often get wrong. Skin improvements require consistency over time.
You need daily 10-15 minute sessions for at least 4-6 weeks before you see visible changes.
I know that sounds like a long time, but collagen remodeling is a slow process. You can't rush it.
As most health practitioners would attest, health is an ‘inside-out’ as well as an ‘outside-in’ process. So, when focusing on the collagen remodeling component, a great addition to the red light therapy process is supplementation.
Golden Collagen provides a wide variety of collagen products that are goal-designed. So Golden Collagen’s wide variety of products here. Also, if you need guidance as to your collagen needs, take their short quiz here.
Acute pain relief can happen much faster, sometimes within days, but needs more frequent sessions initially. I've had shoulder pain disappear after just three days of twice-daily treatments.
But chronic issues require sustained, consistent treatment over weeks or months.
Muscle recovery benefits from strategic timing around workouts rather than just random daily use. I learned this after months of trial and error.
Using red light right after training, when your muscles are inflamed and starting their recovery process, produces noticeably better results than using it at random times throughout the day.
Write this down somewhere: match your protocol to your priority. Don't just use your device randomly and hope for the best. That's what I did initially, and it was a complete waste of time.
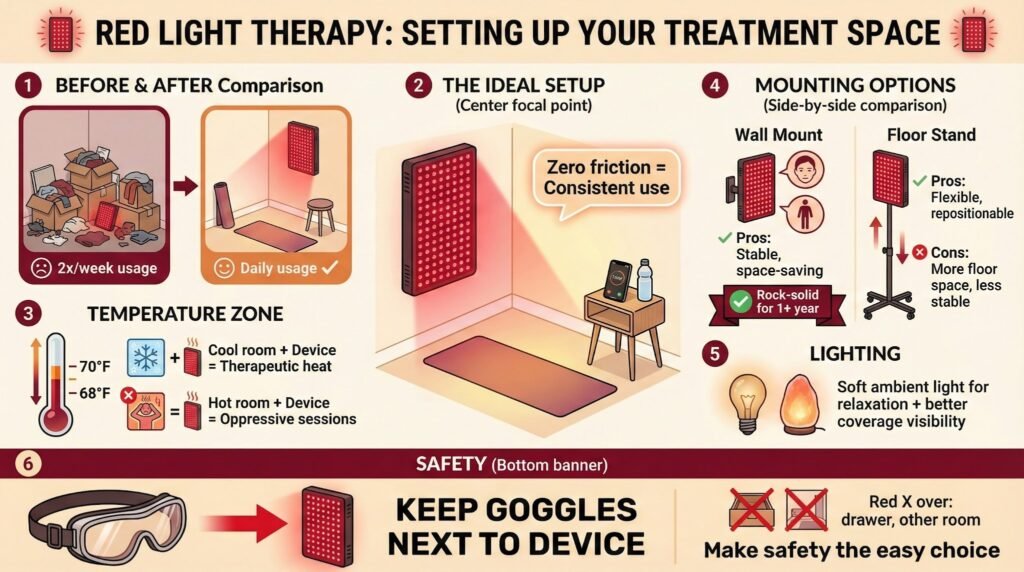
Setting Up Your Treatment Space
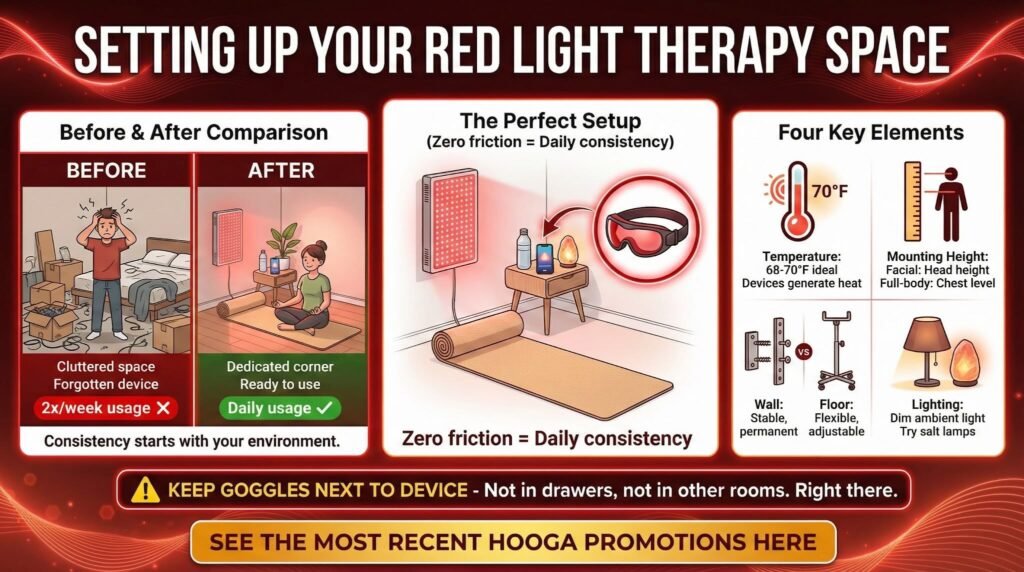
This might sound overly simple, but the physical setup of your red light therapy area directly impacts whether you'll actually use the device consistently.
I learned this the hard way after keeping my HG1000 in a cluttered spare room where I had to move boxes every time I wanted a session. Usage dropped to maybe twice a week. Complete waste.
Your treatment space needs to be accessible, comfortable, and conducive to the 10-20 minute sessions you'll be doing regularly. I eventually moved my panel to a corner of my bedroom with a yoga mat on the floor, a small side table for my phone and water, and everything within arm's reach.
My usage immediately jumped to daily because there was zero friction.I could walk over, turn it on, and start my session without any obstacles or excuses.
Temperature matters more than you'd expect. Red light devices generate heat, especially the larger panels like the HG1000 and HG1500.
If you're in a small, poorly ventilated space, sessions can get uncomfortably warm.
I prefer a slightly cool room, around 68-70°F, because the warmth from the device then feels therapeutic rather than stifling. When the room is already warm, the extra heat from the device can make sessions feel oppressive and cut them short.
For wall-mounted devices, position them at a height that allows you to treat your primary target areas without awkward positioning. If you're mainly doing facial treatments, mount it at head height.
For full-body or torso work, center it around chest level when standing.
The mounting brackets that come with Hooga devices are actually really solid. I was skeptical at first, but mine has been rock-solid for over a year now.
Floor stands offer more flexibility if you treat different body areas regularly. You can adjust the height, angle the panel, and move it around as needed. The tradeoff is that they take up more floor space and aren't quite as stable as wall mounts.
I've used both configurations and honestly prefer the wall mount for my primary device, but I keep a smaller HG300 on a stand for targeted joint work that needs repositioning.
Lighting in your treatment space deserves consideration, too. You don't need to finish darkness, but dimmer ambient lighting helps you relax during sessions and lets you better judge the coverage area of your device.
I use a small salt lamp for gentle background light, just enough to move around safely but not so bright that it's distracting or prevents me from getting into a relaxed state during treatment.
Finally, keep your protective goggles right next to your device. Not in a drawer.
Not in another room.
Right there. Because the moment you have to go hunt for them is the moment you'll convince yourself you can skip them "just this once," and that's how you develop eye strain issues over time.
Make the right choice, the easy choice, by keeping the goggles immediately accessible.
Mastering Distance and Positioning
The distance between you and your Hooga device fundamentally changes the treatment intensity you're receiving. And intensity directly decides both effectiveness and efficiency.
This took me way too long to understand.
The technical term here is "irradiance," measured in milliwatts per square centimeter (mW/cm²). This tells you how much light energy is actually reaching your skin.
When you double your distance from the device, the irradiance doesn't just halve; it drops by roughly 75% because of something called the inverse square law.
Physics is cruel like that.
With the Hooga Charge 2.0, for example, you get about 70 mW/cm² at 3 inches distance, 52 mW/cm² at 6 inches, and only 18 mW/cm² at 12 inches. That means a 10-minute session at 6 inches delivers significantly more energy than a 10-minute session at 12 inches.
You'd need to extend your session time considerably at greater distances to achieve equivalent results.
So why not just position yourself right against the device every time? Because there's a tradeoff between intensity and coverage area.
When you're very close to the device, you get maximum intensity, but only a small area of your body is directly illuminated. Move back several inches, and the light spreads over a larger area, though at lower intensity per point.
For facial red light treatments, position yourself 6-8 inches from my HG300. This gives me strong therapeutic intensity while ensuring my entire face gets relatively even coverage.
Any closer and I'd need to move the device around mid-session to treat all areas effectively.
Any farther and I'm sacrificing intensity without gaining meaningful extra coverage.
For larger body areas using panels like the HG1000, I stay around 12-18 inches away. At this distance, the panel illuminates my entire torso or back in one session.
Yes, the intensity per square centimeter is lower than face-distance treatments, but the larger body area needs that broader coverage, and these bigger panels have higher total LED counts to compensate for the increased distance.
Here's something I learned from experimenting: use closer positioning for acute issues and farther positioning for maintenance. When I had a particularly sore shoulder after a heavy workout, I'd position the Charge 2.0 just 4-5 inches from the joint for concentrated treatment.
For general recovery and wellness maintenance, I use my full-body panel at a standard distance.
Pay attention to the angle too. Light works best when it hits the treatment area perpendicularly, straight on, not from a sharp angle.
When treating your lower back, avoid positioning the panel too high, where it shines downward at a 45-degree angle.
Position it level with your back. This seems obvious, but I see people make this mistake constantly, especially when they're trying to multitask during sessions.
For devices with many LEDs, like all the Hooga panels, the coverage area forms a cone shape, with the brightest, most intense light directly in front of the panel and gradually decreasing intensity toward the edges. The center of your panel always delivers stronger treatment than the peripheral areas.
If you're targeting a specific area, such as a knee injury, position that knee in the center zone, not off to the side, where it will only receive partial coverage.
All Hooga models come with a 3-year warranty, which is standard for the industry.
If you're leaning toward trying the entry-level option, you can check current pricing on the HG300 and other options on their official site. It's a reasonable starting point if you're not sure red light therapy will work for you. Click the button below to get started.
Creating Your Treatment Protocol
This is where theory meets reality. You can understand all the science behind red light therapy, have the perfect setup, and know exactly how to position yourself, but if you don't have a structured protocol that you actually follow consistently, none of it matters.
Let me share the exact framework I use, which I've refined over two years of daily use and quite a bit of trial and error. You can adapt this to your specific goals and schedule, but the underlying principles stay the same.
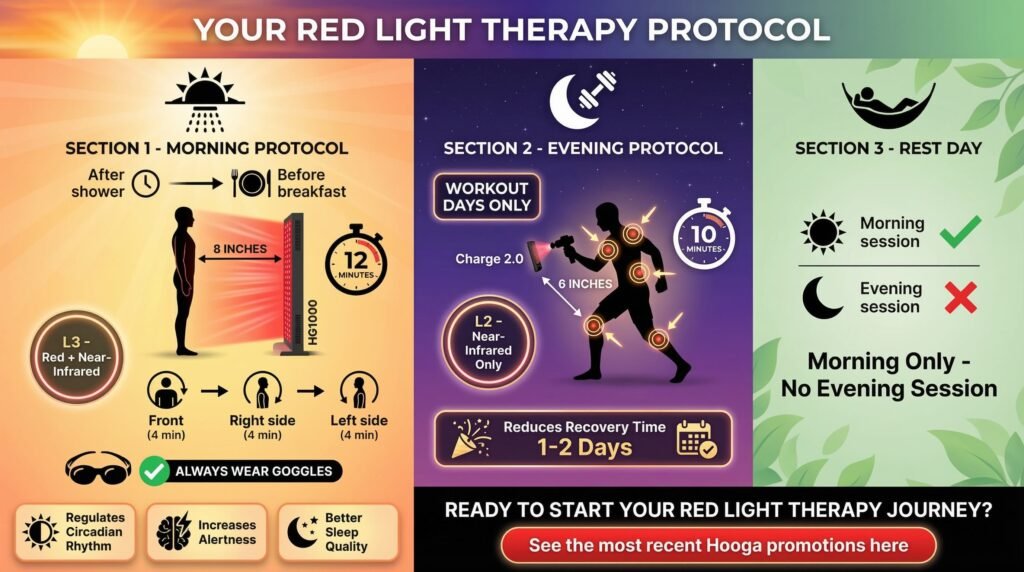
Morning Protocol for Skin and Energy
It is suggested to perform the primary session first thing in the morning. This timing delivers many benefits simultaneously.
Morning red light exposure has been shown in research to help regulate circadian rhythm, increase alertness, and set you up for better sleep quality that night. Plus, treating clean skin right after showering confirms nothing is blocking light absorption, no oils, no products, no dead skin cells interfering with photon penetration.
Stand about 8 inches from the HG1000, positioned so your face and upper torso are fully illuminated. Run L3 mode (combined red and near-infrared) for exactly 12 minutes.
During this time, rotate through positions: 4 minutes facing the panel directly, 4 minutes with my right side toward it, 4 minutes with the left side toward it.
This provides relatively even coverage across the front and sides of the upper body.
Wear the protective goggles the entire time. Not negotiable.
I know some people skip this and claim they're fine, but eye safety isn't worth gambling on.
The goggles that come with Hooga devices are comfortable enough that you forget you're wearing them after about 30 seconds.
Evening Protocol for Recovery
On workout days, consider a second, shorter session in the evening focused specifically on whatever muscle groups I trained. This is pure near-infrared (L2 mode) for deeper tissue penetration. Position the portable Charge 2.0 about 6 inches from the target area and run it for exactly 10 minutes.
For leg day, sit with the device aimed at your quads or hamstrings, depending on what feels most fatigued. For upper body days, position it on whatever muscle group is most sore: shoulders, chest, or back. This targeted evening session has dramatically reduced my next-day muscle soreness.
Again, recovery times are going to vary from person to person based on their own level of health and degree of recovery need.
Rest Day Protocol
On non-workout days, perform a morning session exactly as described above, but skip the evening session. This prevents overdoing it and allows the body's natural circadian rhythm to normalize without late-day light exposure potentially disrupting melatonin production.
Some people find evening red light helps their sleep. Others find it interferes.
Tracking and Adjustments
You need to track your results objectively. Your memory is terrible at accurately assessing gradual changes over weeks and months.
Take photos of your face under consistent lighting every week.
Log subjective energy levels, sleep quality, and any pain or soreness on a simple 1-10 scale daily.
After about 6 weeks of this tracking, patterns become obvious. Skin texture may start improving, those fine lines around the eyes start softening, and average soreness scores may start dropping significantly.
This goal feedback can be motivational during the early weeks when changes weren't yet visible to the naked eye.
If you're not seeing the results you want after 4-6 weeks of consistent daily use, don't just quit. Adjust one variable at a time.
Try moving closer to increase intensity.
Extend session duration by 5 minutes. Switch from combined mode to wavelength-specific modes.
Change the time of day you're treating. Give each adjustment 2-3 weeks before evaluating and potentially changing again.
Common Mistakes That Kill Results
Inconsistent Distance
Be strict about distance, measuring it initially until a developed intuitive sense of proper positioning takes shape. Pick your treatment distance based on your goals and maintain it consistently.
Your body responds to consistent stimuli, not random variable exposure.
Impatience Leading to Overuse
You may not see visible results in the first weeks. Impatience with this gradual process can lead to a 'More is better' approach. Not always.
One can develop skin sensitivity, worsened sleep, and fatigue. There's a real phenomenon called biphasic dose response in photobiomodulation.
Basically, there's an optimal dose range where you get maximum benefits, and both too little and too much light can be less effective or even counterproductive.
Stick to the recommended session times: 10-15 minutes for most applications, maybe 20 minutes max for large body areas with full-size panels. Consistency beats intensity every time.
Treating Through Barriers
Red and near-infrared light need direct access to your skin. A t-shirt blocks a significant percentage of the light. Lotions, oils, and especially sunscreens can reflect or absorb light before it reaches your skin cells.
Even the natural oils and debris on unwashed skin create a barrier that reduces effectiveness.
Treat bare skin. Always. If you're doing full-body sessions and modesty is a concern, do them in a private space.
The difference in effectiveness between treating through a thin shirt and treating bare skin is substantial enough to make or break your results.
Forgetting Hydration
Red light therapy increases cellular metabolism and ATP production. This process needs adequate hydration to work optimally.
I didn't make this connection initially and was chronically under-hydrated (I've never been great about water intake).
Start deliberately drinking 16 oz of water within 30 minutes after the morning red light session. You may notice improved energy and better skin response. Your cells need water to utilize the energy boost that red light provides.
Make hydration a non-negotiable part of your protocol.
Key Takeaways
Distance decides intensity and controls your actual light dose; maintain consistent positioning for reliable results. Closer means stronger treatment in smaller areas, farther means broader coverage at lower intensity per point.
Match your wavelength selection to your goal: 660nm red light for skin and surface tissue, 850nm near-infrared for deep tissue and systemic benefits, or combined mode for comprehensive wellness effects.
Consistency beats intensity every single time. Daily 10-15-minute sessions will always outperform sporadic intensive use, because your cellular response mechanisms adapt to regular stimulation patterns.
Treat bare, clean skin directly with proper eye protection every session without exception, as barriers significantly reduce effectiveness.
Track your results objectively through photos and quantified metrics rather than relying on subjective memory, adjusting one variable at a time if progress stalls after 4-6 weeks.
If you want to start with the most popular option, the PRO300 offers the best balance of power and price. For testing the waters cheaply, the HG300 gets you in the door for under $400.
And if you're interested in the experimental quad-chip approach, check out the Ultra 360 specs here. Click the button below to find the right red light device from Hooga.
Frequently Asked Questions
How close should I sit to my red light therapy panel?
For facial treatments, position yourself 6-8 inches from the device. For full body treatments with larger panels, stay 12-18 inches away.
Closer positioning increases intensity but reduces coverage area, while farther positioning spreads light over more surface area at lower intensity.
Can I use red light therapy twice a day?
Yes, but only for specific applications like acute injury recovery or post-workout muscle treatment. Most people should stick to once-a-day sessions of 10-15 minutes.
Twice-daily sessions work best when one is a general morning session and the second targets a specific issue in the evening.
Should I use red light therapy before or after working out?
After workouts produces better recovery results. The 30-60 minute window post-exercise is when your muscles are most inflamed and primed for recovery signaling.
Some people also use shorter pre-workout sessions (5-7 minutes) about 30-45 minutes before training to boost ATP availability.
What wavelength is best for wrinkles?
The 660nm red light wavelength works best for wrinkles and other skin concerns. This visible red light penetrates surface skin layers where collagen-producing fibroblasts live, stimulating increased collagen production that reduces fine lines over time with consistent use.
How long before I see results from red light therapy?
Skin improvements typically become visible after 4-6 weeks of daily use. Acute pain relief can happen within days.
Muscle recovery benefits are often noticeable within the first week.
Chronic issues require sustained treatment over 8-12 weeks for meaningful improvement.
Do I need to wear goggles during red light therapy?
Yes, always wear the protective goggles that come with your Hooga device. Direct exposure to high-intensity LEDs causes eye strain and potential long-term vision issues.
The goggles are comfortable, and you'll forget you're wearing them within seconds.
Can I use moisturizer before red light therapy?
No, remove all lotions, moisturizers, sunscreens, and makeup before treatment. These products create a barrier that reflects or absorbs light before it reaches your skin cells, significantly reducing effectiveness.
Treat clean, bare skin only.
Does red light therapy help with joint pain?
Yes, the 850nm near-infrared wavelength penetrates deep enough to reach joints, reducing inflammation and stimulating cellular repair. Position the device 6-8 inches from the affected joint and use 10-15-minute sessions daily for chronic issues or twice daily for acute flare-ups.
This article includes affiliate links. If you click through and make a purchase, I may receive a small commission. This helps support the site and allows me to keep creating helpful content at no extra cost to you.