Quick Summary
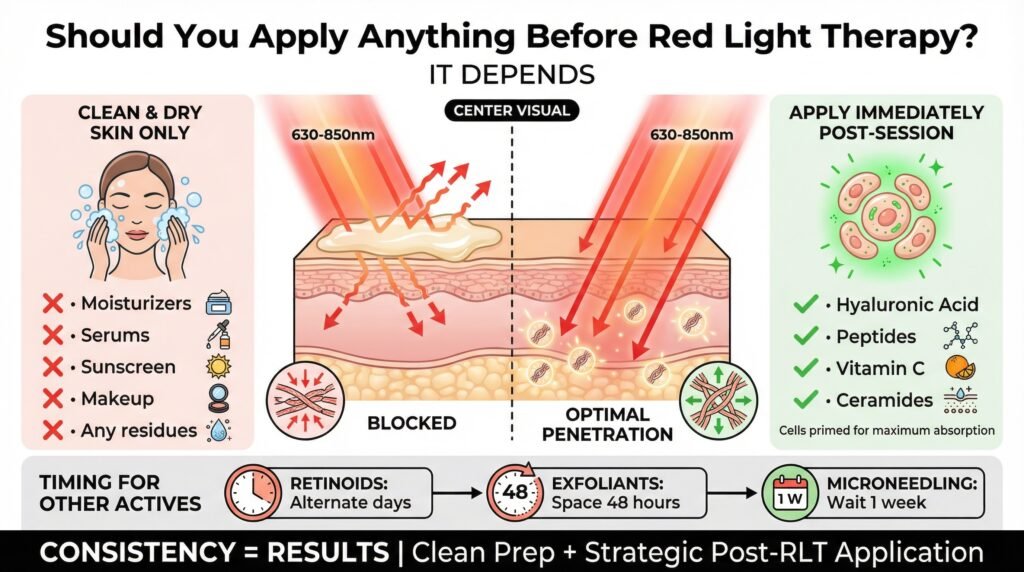
For red light therapy (RLT) to be most effective, your skin should be completely clean and dry before each session. Apply nothing (no moisturizers, serums, sunscreens, makeup, or residues) in most cases, as these create barriers that scatter, reflect, or absorb the therapeutic wavelengths (630–850 nm), reducing light penetration to target cells for collagen production and other benefits.
The article (Part 2 of a series) stresses that the real “magic” happens post-treatment: apply potent skincare immediately after sessions when cells are metabolically active and primed for better absorption (e.g., hyaluronic acid, peptides, vitamin C, ceramides). Timing matters with other actives, alternate retinoids, space out exfoliants by ~48 hours, and wait ~1 week after at-home microneedling to avoid irritation. Consistency in clean prep + post-RLT application maximizes results and avoids wasting sessions.
Table of Contents
- Introduction: Overview of why preparation and timing with red light therapy matter, including the author’s personal routine restructuring for better results.
- The Post-Treatment Window of Opportunity. Why apply actives right after RLT (heightened cellular activity, better nutrient delivery)? Example routine with hyaluronic acid, peptides, and ceramide moisturizer.
- Timing Red Light Therapy With Other Treatments
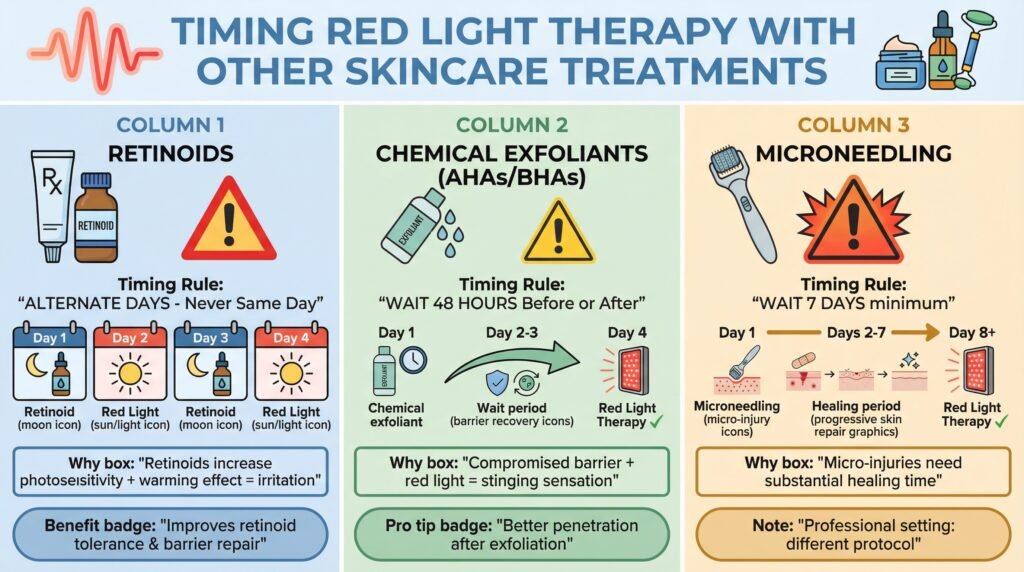
- Retinoids and RLT (avoid same-day use due to irritation/photosensitivity; alternate days)
- Chemical Exfoliants (AHAs/BHAs; schedule 48+ hours apart for barrier recovery and better penetration)
- Microneedling and Professional Treatments (wait 1 week post-at-home microneedling; pros may combine immediately)
- What I Wish Someone Had Told Me From the Start: Lessons from early wasted sessions due to residue barriers; importance of logging prep details (cleanse method, drying time, skin feel) for optimization.
- Practical Considerations for Different Skin Types
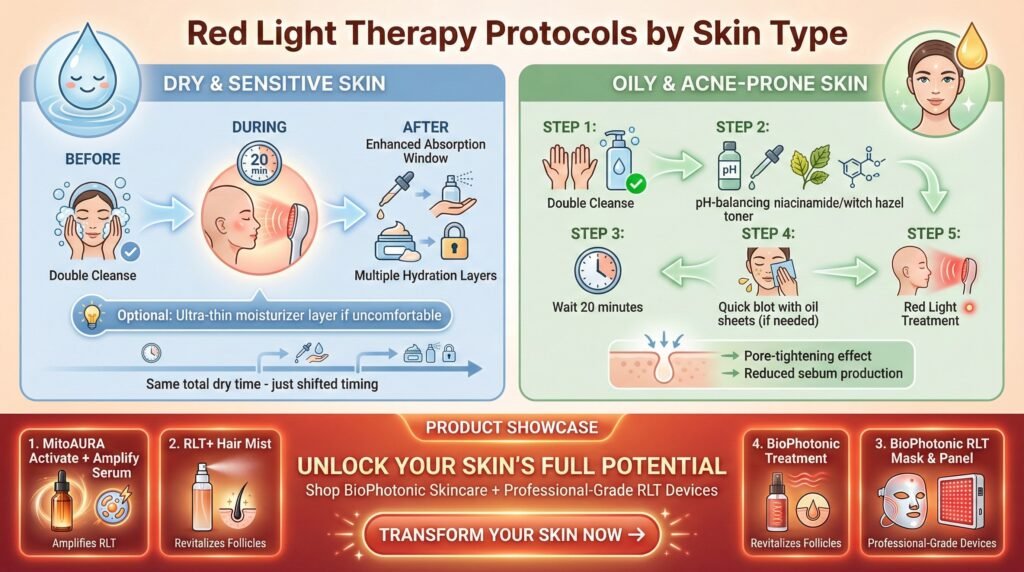
- Dry/Sensitive Skin (bare preferred, but thin lightweight moisturizer if needed, reduces effectiveness slightly)
- Oily/Acne-Prone Skin (double cleanse + pH-balancing toner like niacinamide or witch hazel to control oil without residue)
- BioPhotonic Skincare Products Mentioned Mito Red Light’s specialized line (MitoAURA spray, Activate + Amplify Serum, RLT+ Hair Mist) designed to enhance RLT effects (some can be used strategically around sessions).
- Measuring Your Results to Validate Proper Preparation Track with weekly photos, moisture meter readings, and session warmth sensation (even, gentle warmth indicates good absorption).
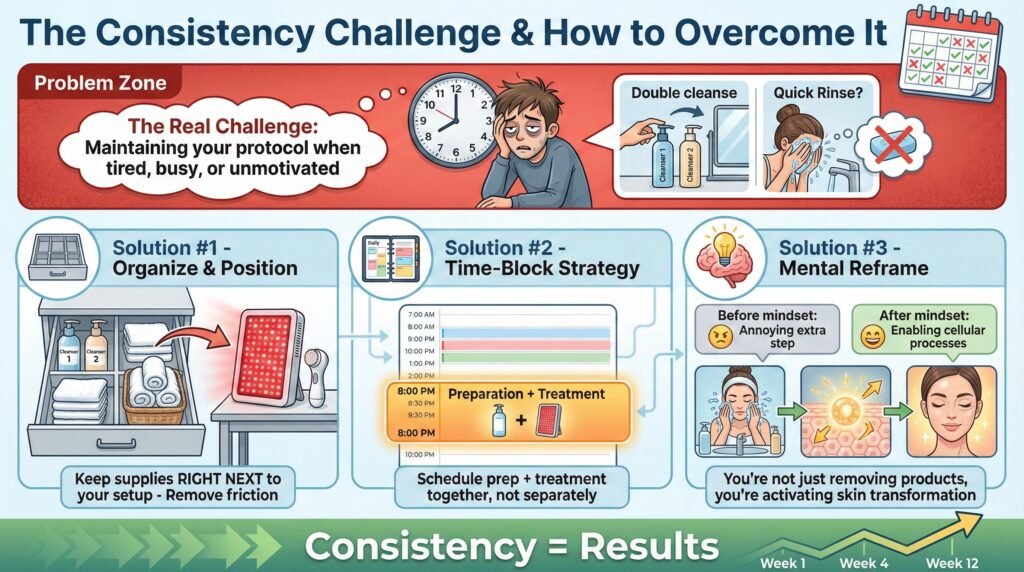
- The Consistency Challenge and How to Overcome It Tips: organize supplies, time-block sessions, reframe prep as essential for outcomes like reduced fine lines.
- Key Takeaways & People Also Asked Core rules (clean/dry skin before, products after); quick answers to common questions (e.g., no serum/moisturizer/sunscreen before; wait ~5 min after cleansing to dry).
The Post-Treatment Window of Opportunity
Moving on from part 1, here is where things get really interesting, and where you can actually leverage your skincare products for the most benefit. Immediately after red light therapy, your skin is in a heightened state of cellular activity.
Your fibroblasts are ramped up, your circulation is increased, and your cells are primed to absorb and use nutrients.
This is the perfect time to apply your most potent, expensive serums and treatments. I am talking about your vitamin C serums, your peptide formulations, your growth factor products, all the fancy stuff that costs a small fortune.
The increased cellular metabolism and enhanced circulation mean these ingredients get delivered more effectively to active cells that can actually use them.
I have completely restructured my skincare routine around this principle. Instead of applying products throughout the day when my skin is just sitting there doing baseline maintenance, I stack everything after my evening red light session when my cells are actively working.
My hyaluronic acid serum goes on first to flood newly energized cells with hydration. Then I layer a peptide serum to support the collagen synthesis that has already been triggered. Finally, I seal everything with a rich moisturizer containing ceramides and fatty acids to support barrier repair.
The difference this timing shift made was honestly more dramatic than I expected.
Products that I had been using for months without particularly impressive results suddenly started delivering visible improvements. My theory is that applying potent ingredients when your cells are metabolically active versus when they are just maintaining baseline function makes those ingredients far more effective.
Timing Red Light Therapy With Other Treatments
One thing that really complicated my early experiences with red light therapy was figuring out how to schedule it alongside my other skincare treatments. I was using prescription tretinoin, doing occasional at-home chemical peels, and had just started experimenting with microneedling.
Trying to fit red light therapy into that routine without clear guidance about timing and interactions led to some uncomfortable skin irritation and side effects
Retinoids and Red Light Therapy
These should never happen on the same day, at least not in my experience. Retinoids increase your skin’s photosensitivity and can make it more reactive to various stimuli.
While red light therapy is not UV radiation and does not cause the same kind of sun damage, the combination of retinoid-sensitized skin and the warming effect of red light therapy created more irritation than my skin could handle.
I now alternate days. Retinoid nights are just retinoid nights, with no red light therapy before or after.
Red light therapy days are completely retinoid-free.
This schedule has eliminated the low-grade irritation I was experiencing and has improved my retinoid tolerance, as the red light therapy days seem to help with skin barrier repair and reduce inflammation.
Chemical Exfoliants
AHAs and BHAs temporarily compromise your skin barrier, which is kind of the point, they are removing dead skin cells and encouraging cellular turnover. But doing red light therapy on barrier-compromised skin felt uncomfortable for me.
There was an unusual stinging sensation that did not happen when my barrier was intact.
I schedule chemical exfoliation for at least forty-eight hours before or after red light sessions. This gives my skin time to recover its barrier function and prevents any uncomfortable sensations during light therapy.
Interestingly, when I do red light therapy two days after exfoliating, I feel like I get even better results because the light can penetrate more easily through the freshly exfoliated surface.
Microneedling and Professional Treatments
This needs even more careful timing. Microneedling creates micro-injuries in your skin, and you need substantial time to heal before adding red light therapy to the mix.
I wait at least one full week after microneedling before resuming red light sessions.
Some practitioners actually use red light therapy immediately after microneedling to enhance healing, but that happens in a controlled professional setting where they can watch your skin’s response. For at-home use, being conservative with timing prevents complications.
What I Wish Someone Had Told Me From the Start
Looking back at my first three months of red light therapy use, I estimate I wasted about forty percent of my sessions by not preparing properly. That equals roughly twenty-four sessions where I could have been seeing added improvements, but instead was getting mediocre results because I had moisturizer or sunscreen residue creating barriers.
The financial waste bothers me less than the time waste. Those are hours of my life standing in front of a light panel that could have been more productive if I had just understood the basic science of light penetration from day one.
What finally turned things around was treating the preparation protocol with the same importance as the treatment itself. I started keeping a simple log: cleanse method, drying time, any products accidentally applied, and subjective assessment of skin feel during treatment.
This log revealed patterns I had not noticed, like how using my heavier makeup remover left more residue than my lighter cleansing oil, or how waiting an extra five minutes after drying made the warming sensation during treatment more uniform.
The other critical realization was that consistency in preparation matters as much as consistency in treatment frequency. You cannot properly prepare four days a week and do sloppy preparation the other three days and expect optimal results.
The added effect of red light therapy depends on each session building on the previous one; any poorly prepared session breaks that accumulation.
Practical Considerations for Different Skin Types
Dry and Sensitive Skin
If you have chronically dry or sensitive skin, the idea of doing a double cleanse and leaving your skin completely bare might feel wrong. Everything in your skincare education has taught you to never leave dry skin without immediate moisture replenishment.
I have naturally dry skin myself, so I understand this resistance.
What helped me get comfortable with bare skin treatment was reframing the timeline. Yes, my skin is bare and dry during the twenty-minute red light session.
But immediately afterward, I am applying more hydration and moisture than I would normally use because I am taking advantage of that post-treatment absorption window.
So, my skin is not actually spending significantly more time in a dry, unprotected state. The timing of product application has simply shifted.
If your skin is so dry that even twenty minutes feels uncomfortable, you can apply an extremely thin layer of a lightweight, non-occlusive moisturizer before treatment. This will reduce effectiveness somewhat, but it beats skipping red light therapy altogether because the bare skin protocol feels intolerable.
Just make sure you are using the absolute least amount, barely enough to take the edge off the tight, dry sensation.
Oily and Acne-Prone Skin
For oily skin types, the double cleanse protocol is usually easier to embrace because you are already familiar with thorough cleansing. The challenge is more about managing oil production between cleansing and treatment, especially if you are doing evening sessions and your skin has been producing oil all day.
I have found that using a pH-balancing toner after the double cleanse helps control oil production for the twenty minutes before treatment. Look for toners with niacinamide or witch hazel that help temporarily tighten pores and reduce oil secretion without leaving residue on your skin surface.
If your skin produces significant oil during the waiting period after cleansing, a quick blot with oil-absorbing sheets right before treatment can help without requiring a full extra cleanse.
Also, Mito Red Light has specifically formulated a small line of BioPhotonic Skincare products for both skin and hair care and health to work with the therapeutic effects of red light therapy.
- MitoAURA: Red Light Therapy Enhancing Body Spray – BioPhotonic Skincare is the pioneering light-enhancing spray crafted to actively partner with red light therapy, not merely coexist with it. Harnessing photoconverting spirulina and light-activated DNA repair enzymes, this innovative mist helps your skin capture more light, accelerate recovery, and deliver a deeper, more radiant glow. Before, during, and after every session.
- MitoAURA™ Activate + Amplify Serum – BioPhotonic Skincare™ Developed over two years at the crossroads of photobiology and mitochondrial research, MitoAURA™ Activate + Amplify Serum stands as the world’s first serum precision-engineered to amplify red light therapy. This groundbreaking formula energizes mitochondria, maximizes light absorption and utilization, and elevates every RLT session into a profoundly rejuvenating experience.
- RLT+® Hair Mist | Red Light Therapy Adjunct for Hair Created by hair loss researcher Brian Simonis, the RLT+ Hair Mist features a synergistic botanical blend expertly formulated to boost the effects of red light therapy on the scalp and revitalize hair follicles. Proudly made in the USA.
Click here to access Mito Red Light’s BioPhotonic Skincare products as well as affordable and effective red light therapy devices for at-home use.
Measuring Your Results to Validate Proper Preparation
One thing that really helped me stay committed to proper preparation was implementing goal measurement methods instead of relying solely on subjective impressions. You can easily convince yourself that your shortcut preparation is “probably fine” when you cannot immediately see the difference.
I started taking weekly photos under consistent lighting conditions, same location, same time of day, same camera settings. This created a visual record that showed whether my skin texture, tone, and fine lines were actually improving or staying the same.
When I compared photos from my lazy preparation phase versus my strict protocol phase, the difference was undeniable.
I also used a simple skin moisture meter to track hydration levels and found that proper pre-treatment preparation followed by post-treatment product application actually improved my skin’s baseline moisture levels more than my old routine of constant product application throughout the day.
Another metric I tracked was the warming sensation during treatment. With properly prepared skin, I could feel a gentle, even warmth across my entire treatment area within about five minutes.
With product barriers, the warming was uneven, took longer to develop, or sometimes did not happen at all in certain areas.
That warmth is actually an indicator of light absorption, so more consistent warming meant better preparation.
The Consistency Challenge and How to Overcome It
The hardest part of proper red light therapy preparation is not the protocol itself; maintaining that protocol consistently day after day, especially when you are tired, busy, or just not in the mood, becomes the real challenge. I have definitely had evenings where I seriously considered skipping the double cleanse and just doing a quick rinse because I was exhausted.
What keeps me consistent is having my preparation supplies organized and readily accessible. I keep my cleansers, washcloths, and towels in a dedicated drawer right next to my red light setup.
This removes the friction of having to gather supplies from different locations when I am already tired and tempted to cut corners.
I also time-blocked my preparation and treatment as a single unit in my calendar. Instead of thinking “I need to do red light therapy tonight,” I think “I have my red light session from 8:00 to 8:30,” and that time block includes the preparation.
This prevents the mental separation between preparation and treatment that makes preparation feel like an annoying extra step.
Another strategy that helped was connecting the preparation ritual to the outcome I am actually after. When I am standing at the sink doing my double cleanse, I am not just removing products; I am actively enabling the cellular processes that will reduce my fine lines and improve my skin texture.
That mental reframe makes the preparation feel less like a chore and more like an essential part of the therapeutic process.
Key Takeaways
Your skin must be completely clean and dry before every red light therapy session to allow the most light penetration to target cells.
Any product on your skin surface creates barriers that scatter or absorb therapeutic wavelengths before they reach deeper skin layers, where collagen production happens.
The double cleanse method using an oil-based cleanser followed by a water-based cleanser ensures complete removal of all product residues and barriers.
Post-treatment product application maximizes your skincare products’ effectiveness because your cells are metabolically active and primed for nutrient absorption after red light exposure.
Consistency in preparation protocol matters as much as consistency in treatment frequency for achieving added results over time.
On the note of consistency for lasting results, red light therapy sessions within a professional clinical setting can be anywhere between $75 to $100 per session. This can be costly if one is practicing a efficacious frequency of 2 to 3 sessions per week.
To address this, we have provided a list of reviews of the most effective and affordable red light therapy devices for at-home use here. Use the cost-savings calculators in every product review to find which device best suits your budget.
People Also Asked
Can I use serum before red light therapy?
You should not use serum before red light therapy because even lightweight serums create a film with a different refractive index than your skin, causing light to scatter and reflect as opposed to penetrate effectively. Save your serums for immediately after treatment when your cells are metabolically active.
Should skin be wet or dry for red light therapy?
Your skin should be completely dry for red light therapy because water droplets and moisture films create tiny lenses that refract and scatter light in many directions, reducing the concentration of therapeutic energy reaching your target tissues.
Can I do red light therapy after applying retinol?
You should not do red light therapy on the same day as retinol application because retinoids increase your skin’s sensitivity and the combination can cause uncomfortable irritation. Alternate days instead, with retinoid nights being completely separate from red light therapy days.
Does sunscreen block red light therapy?
Sunscreen significantly blocks red light therapy, especially mineral sunscreens containing zinc oxide or titanium dioxide. These ingredients physically scatter and reflect light across all wavelengths, including the therapeutic red and near-infrared spectrum you are trying to deliver to your skin.
How long should I wait after cleansing to do red light therapy?
You should wait about five minutes after cleansing and drying to do red light therapy. This waiting period allows any remaining microscopic moisture on your skin surface to evaporate completely, ensuring optimal light penetration to your deeper skin layers.
This article includes affiliate links. If you click through and make a purchase, I may receive a small commission. This helps support the site and allows me to keep creating helpful content at no extra cost to you.